As an Android Engineer, think about how much time you waste in deploying an APK for someone to test. ⌛️
It may be done in many steps, compile your project, run unit test, start generating your .apk file, then upload it to a third party (e.g. firebase distribution, diawi, etc ..). After that, you have to notify the testers that your build is ready for testing.

A tiring repetitive process that wastes a set amount of time every single time you need to do it.
With CI/CD, we can automate the process and solve the time-wasting problem. 🎉🎉
So, what is CI/CD in a nutshell?
Continuous integration (CI) and continuous delivery (CD) embody a culture, set of operating principles, and collection of practices that enable application development teams to deliver code changes more frequently and reliably. The implementation is also known as the CI/CD pipeline.
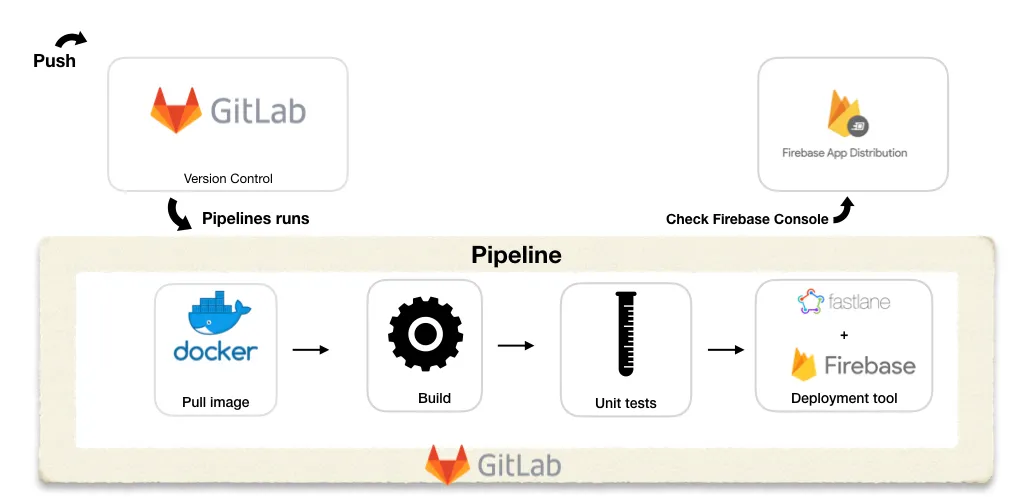
Talking a little bit more about my solution. It consists of 4 main components:
-
**GitLab**: It plays dual rule, version control, and CI/CD platform.
-
**Fastlane**: According to the official website, Fastlane is an open-source platform aimed at simplifying Android and iOS deployment. Fastlane lets you automate every aspect of your development and release workflow.
-
**Docker**: it is a containerization tool that allows a developer to package up an application with all of the parts it needs.
-
**Firebase App Distribution:** Firebase provides this tool which makes distributing your apps to trusted testers painless. By getting your apps onto testers’ devices quickly, you can get feedback early and often.
Solution steps? … let’s go 🏃🏻♂️
Step 1: Configure GitLab
GitLab one of the most popular CI/CD platforms. As I mentioned earlier, relying on GitLab for lots of reasons, the most important one is that it works as a CI/CD platform and our project versions control.
a. Create an Android project, import the project to GitLab. You can check this answer on StackOverflow.com for further help.
b. After pushing your project to GitLab, you should configure CI/CD for this project.

After pressing Setup CI/CD, gitlab.yml will be created. With this file, we can define the stages of the pipeline. For this project we are going to define the following 3 stages in the pipeline:
-
Build
-
Test
-
Deploy
For now, let’s keep the file empty since we will be configuring our **gitlab.yml **file later.
Step 2: Configure Fastlane
We can use Fastlane as a continuous delivery tool both locally remotely. We will need to pick our APK distribution channel where our deployment will be uploaded (HockeyApp, Slack, Firebase distribution, etc…).
a. Install Fastlane in your machine.
Explore for Mac and Linux. (For Mac users, I recommend installation by Homebrew) Explore for Windows
After installation, check everything is works fine by running:
$ fastlane env
b. Now, we can start Fastlane for our Android project. Just open the terminal tab in the android studio. Run the following:
$ fastlane init
c. Just enter your package name, and you can skip secret JSON file because we are interested in Beta deployments
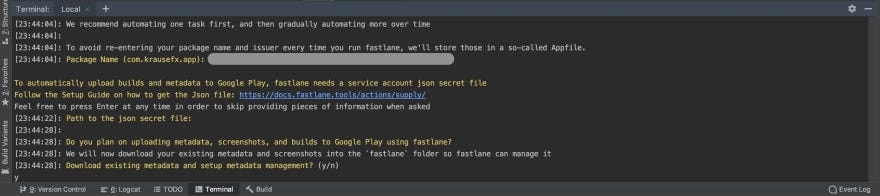
d. After that, navigate to the created Fastlane directory in the root of the project that contains 2 files inside: Appfile: This contains properties and meta-data about your app. Supports multi-flavors. (We aren’t interested in this) Fastfile: This contains configuration what and how to automate your processes i.e build, upload, etc… Gemfile: it used to define your dependencies on Fastlane.
Remark: Don’t forget to force add and push the previously mentioned files.
Now, Fastlane has been configured!
So have a break 🥐☕️ … and get ready for the majesty in part 2 🤓✌️