In part 1 we managed to configure GitLab and Fastlane. Following next, we will configure our Continuous Deployment channel.
Step 3 : Configure FirebaseAppDistribution (Our CD Channel)
As we mentioned in part 1, FirebaseAppDistribution is a tool provided by Firebase where you can upload your beta .apk files.
You can find many posts that use Slack channels as their CD channel. In my opinion, this isn’t a perfect channel because it’s plan limitation. Their free plan has storage of 4 GB for all channels within the workspace, which may limit your App APK files to be uploaded.
So, what makes FirebaseAppDistribution distinctive? 🤔 With FirebaseAppDistribution you can send your beta deployment with a direct E-mail, by mentioning Emails of testers. You can also add release notes to your deployments. Last but not least, a great dashboard for versions uploaded to FirebaseAppDistribution.

To setup FirebaseAppDistribution we can do so in 3 steps:
a. Create an Android Firebase application. Firebase documentation is outstanding 🤩🤩, So make sure you follow it. Also, don’t forget to Get Started with FirebaseAppDistribution.
b. Install Firebase CLI to your machine. With the command-line interface we can make use of firebase’s commands to help us upload beta deployments. For this, make sure to follow Firebase’s CLI documentation.
c. Check Firebase is installed correctly.
$ firebase --version
Step 4 : Fastfile
Now, it’s time to write the steps that Fastlane would follow to upload our beta deployments to FirebaseAppDistruibution.
desc "Submit a new beta build to Firebase App Distribution"
    lane : distribute do
        build_android_app(
          task: "assemble",
          build_type: "debug"
        )

        firebase_app_distribution(
            app: "replace this with app Id. Go to Firebase console ->     Project Overview -> Project Setting",
            testers: "example1@domain.com,     example2@domain.com",
            firebase_cli_token: "firebase token"

        )

      end
Fastlane contains lanes where a lane is a specific task in Fastlane. For example, we have a lane called distribute that would build a debug APK, and using firebase_app_distribution it would upload the APK to the specific app in Firebase console.
app: As mentioned earlier, go to Firebase console -> Project Overview -> Project Setting.
testers: Define testers emails separated by “,”
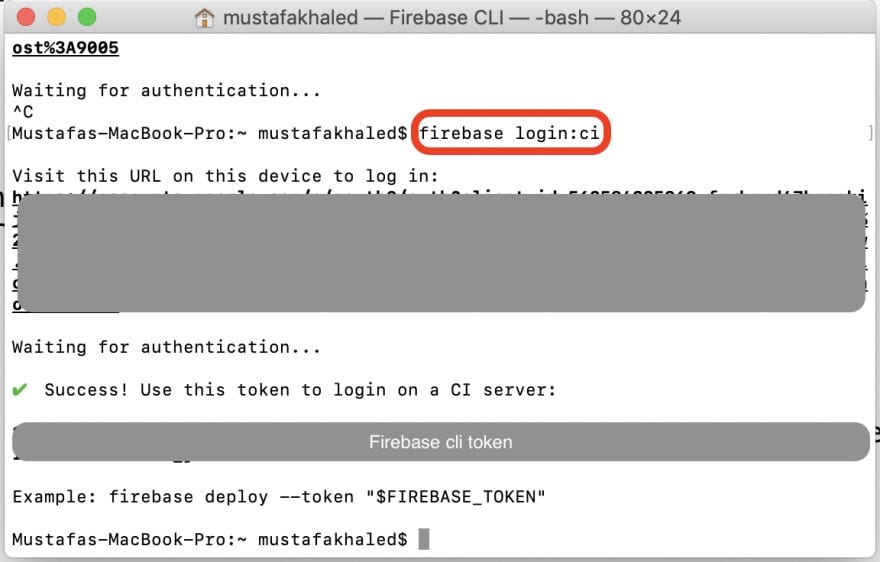
firebase_cli_token: This token is required for the distribution process. To get this token:
-
Open your terminal
-
run the following command
$ firebase login:ci
-
Open the link
-
Choose the account where your project is rest
-
Allow permissions for firebase
Now you can see the token generated for firebase CLI 🎉🚀
Remark: Please commit&push changes in Fastfile. 👌
Next, let’s run our new distribute lane from Fastlane with the following code.
$ fastlane distribute
You will probably see an error like the following:
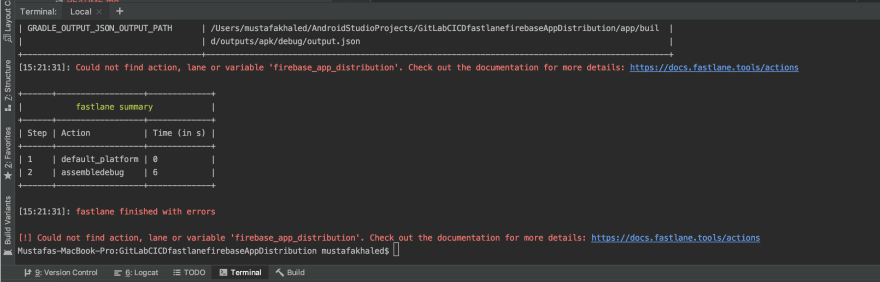
Fortunately, the error is very descriptive. Fastlane doesn’t know what firebase_app_distribution is.
To fix the above error, we should add firebase_app_distribution as a dependency for Fastlane (through Gemfile). So from the Android Studio terminal, we can add the firebase_app_distribution plugin with:
$ fastlane add_plugin firebase_app_distribution
Remark: New files would be generated within Fastlane directory of your Android project after adding this plugin, So make sure committing & pushing changes
Now, everything is up and running, give another try
$ fastlane distribute
Wohooooo 🎉🎉 Great job, please check your emails listed in the fastfile to ensure that an email has been sent with an invitation.

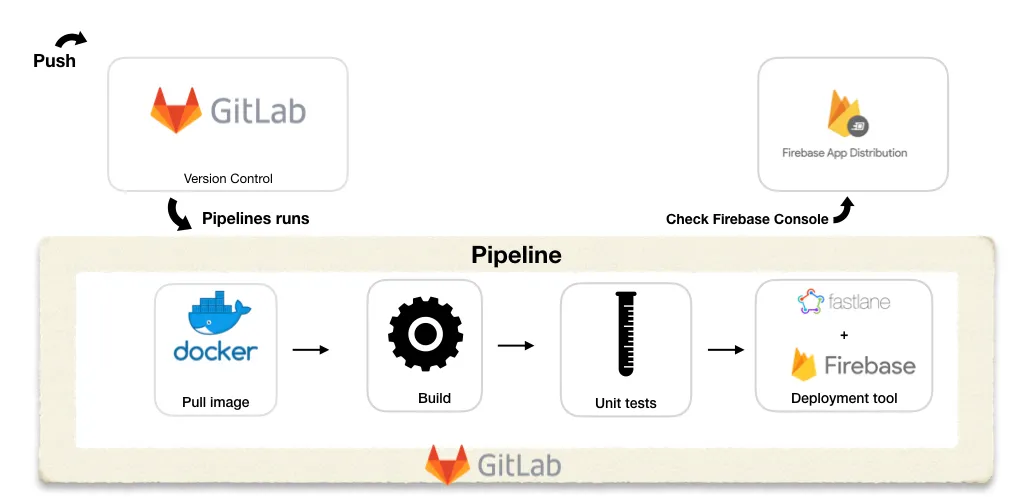
The next step is to include automation 🚀 using GitLab CI/CD pipeline. Our goal is to ensure that when we push to the origin branch (like develop or master) the pipeline should start its stages.
Step 5: Configure gitlab-ci.yml
You can find gitlab-ci.yml in the root of your Android project.
What is the gitlab-ci.yml file? This is a file that defines the structure and order of the pipelines. As we mentioned earlier, our pipeline consists of 3 stages
-
build
-
test
-
deploy
image: mustafakhaled/android-fastlane-firebase:1.0
stages:
- build
- test
- deploy
lintDebug: stage: build script:
- ./gradlew -Pci –console=plain :app:lintDebug -PbuildDir=lint
assembleDebug: stage: build script:
- ./gradlew assembleDebug artifacts: paths:
- app/build/outputs/
debugTests: stage: test script:
- ./gradlew -Pci –console=plain :app:testDebug
deploy_internal:
stage: deploy

script:
  - fastlane distribute
Maybe seems like weird syntax, but don’t worry we will go through this file in detail 😄😁.
image: mustafakhaled/android-fastlane-firebase:1.0
As we mentioned in part 1, Docker: it is a containerization tool that allows a developer to package up an application with all of the parts it needs. I wrapped up all parts need for our application in a docker image, where we can use it in our continuous integration.You can check it out in Docker Hub. This image contains basic tools that serve our main goal. it contains:
-
Linux
-
Android SDK
-
Fastlane
-
Firebase tools
If you think about it, you would find this environment is like your machine environment where you were able to build and send your app to FirebaseAppDistrubution.
stages:
  - build
  - test
  - deploy
In this part, we just define the stages of the pipeline.
lintDebug:
  stage: build
  script:
    - ./gradlew -Pci --console=plain :app:lintDebug -PbuildDir=lint
This job is run on the build stage, it will run the lint check which helps find a poorly structured code that can impact the reliability and efficiency of your Android apps and make your code harder to maintain.
assembleDebug:
  stage: build
  script:
    - ./gradlew assembleDebug
  artifacts:
    paths:
    - app/build/outputs/
This job is also on the build stage. It’s responsible for building debug APK. The artifacts are a list of files and directories to attach to a job on success.
debugTests:
  stage: test
  script:
    - ./gradlew -Pci --console=plain :app:testDebug
This job is on the test stage. It ’s responsible for run unit tests if found in your projects.
stage: deploy

  script:
    - fastlane distribute
This job is on the deploy stage. It’s responsible to deploy your beta deployment to firebaseAppDistribution as we accomplished it locally(without CI).
Enhancement: We want this pipeline to run only if I pushed to the master branch, not all branches. This could be done in gitlab-ci.yml by modifying the stage of deploy.
stage: deploy

  only:
    - master

  script:
    - fastlane distribute
Remark: You can define any branch you want.
The last step is to push your gitlab-ci.yml and your pipeline would start.
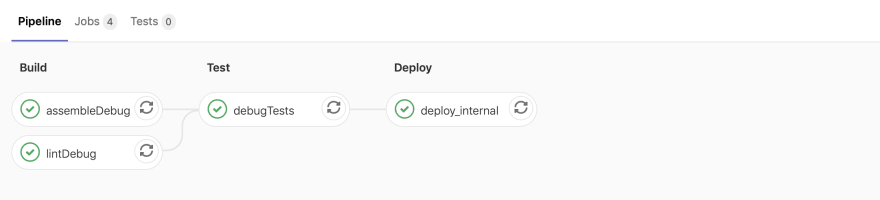
Open GitLab, your pipeline should be like this:
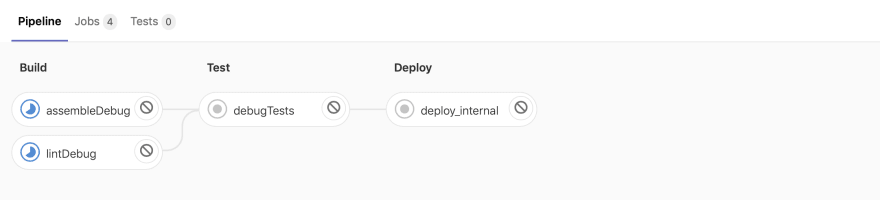
Wait for the pipeline to complete.
Time to celebrate! 🎉 Now you have automated your beta deployments to testers' emails with no hassle. 🚀
Check the full repository on my GitLab
For any feedback or questions, please comment below.
You can also reach me out through:
-
Twitter: @mus_khaled